Meraki notifications by email are nice, but the ever-ending alert emails I get from other applications make staying on top of changes in the network almost impossible. As we use Webex Teams amongst our team, I wanted to receive the alerts in Webex instead. Cisco has a great DevNet guide on this that helped me set this up at this link. While the guide is sufficient to get this working with local alerts, I found a way to make this available to the internet to receive Meraki alerts. I have also made changes to the default file you get from Cisco to work with DNA Center and Meraki. I will include that in another blog post if anyone is interested.
You will need a Meraki account, a Webex Teams account, and a server to run the script. If you want this to run 24/7, you will need to configure this on a server that you plan to run all the time and not on a desktop/laptop. I have this configured on an Ubuntu server.
Getting the Meraki API key
You can get this by logging into your Meraki account and going to Organization > Settings. On this page, scroll to the bottom and check the box ‘Enable access to the Cisco Meraki Dashboard API’. Save the changes, then click the ‘profile’ link that is under the checkbox.
Scroll down to the API section and click on ‘Generate new API key’. MAKE SURE TO SAVE THIS AS YOU CANNOT GET IT BACK AFTER ACCEPTING. If you lose the API key, you will have to generate a new one and edit the python script we will be working with later.
Creating the Webex Teams bot
With your Webex Teams account, log into https://developer.webex.com. In the top right corner of the screen, click on your picture and select ‘My Webex Apps’. Click on ‘Create New App’ and ‘Create Bot’. The following information will need to be filled out:
1. The Bots Name – Give this any name you want. I chose “Network Alerts”.
2. Bot username – This must be unique
3. Icon – Choose from the defaults or upload your own
4. Description – Give the bot a description
5. Click ‘Add Bot’
On the next page, save the bot token somewhere safe. YOU CANNOT GET THIS BACK EITHER WITHOUT REGENERATING THE TOKEN.
Getting the Webex Room ID
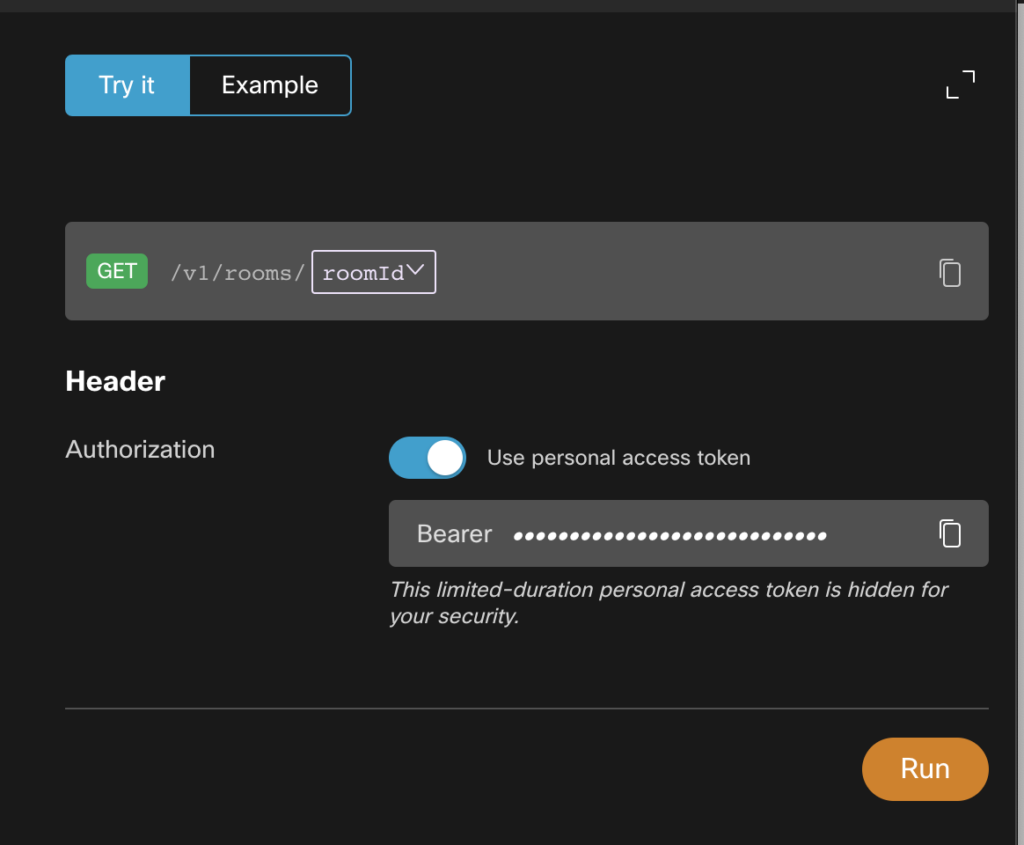
To get the room ID, go to this URL – https://developer.webex.com/docs/api/v1/rooms/get-room-details. Make sure that you are logged into your Webex account on this page. On the right side, click the drop-down over ‘roomId’ and search for the room name you are trying to get the room ID. Once selected, click Run at the bottom. The output below will give you the room id next to ‘id:’

Installing the Python Script
You will need Git installed. To install Git, run the following command.
sudo apt install gitCreate a directory that you want the script downloaded to. I have chosen /home/code/
Move into the directory you created, and download the script using Git. Then create the python virtual environment, activate the virtual environment, and install the required packages with pip and the requirements file.
cd /home/code/
sudo git clone https://github.com/CiscoDevNet/meraki-code
cd meraki-code/
sudo python3 -m venv venv
source venv/bin/activate
sudo pip3 install -r requirements.txt
The next step is to put the 3 API keys into the file meraki-code/env_user.py
WT_ACCESS_TOKEN = “This is the bot token, paste it here”
WT_ROOM_ID = “Paste the room ID here”
MERAKI_API_KEY = “Paste the Meraki API key here”
sudo nano env_user.py
An example output would look like this:
WT_ACCESS_TOKEN = "BOTTOKENGOESHERE"
WT_ROOM_ID = "ROOMIDKEYGOESHERE"
MERAKI_API_KEY = "MERAKIAPIKEYGOESHERE"
There are a few ways that you can go about changing the python script.
1. You can take a copy of the given script and make your changes in that
2. You can create a blank file and copy and paste the code. I will paste it below and then make your necessary changes.
Copy The Given Script
This download comes with a default script, but I wanted to make some changes to fit our use case. Go to the directory meraki-code/meraki-webhooks and take a copy of the file webhookreceiver.py
I have called this file webhookreceiver1.py; you can name it whatever you would like. From here, make your needed changes to webhookreceiver1.py
cd /home/code/meraki-code/meraki-webhooks/
cp webhookreceiver.py webhookreceiver1.py
My Scripts Changes
I am VERY new at python and realize that there might be cleaner ways to write my changes. If you have any recommendations, please leave a comment below, and I would be more than welcome to the critique. My changes from the default file are in red. Here is an output of my file webhookreceiver1.py
#!flask/bin/python

from pprint import pprint
from flask import Flask
from flask import json
from flask import request
from flask import render_template
import sys, getopt
import json
import os
import sys
import ciscosparkapi

# Get the absolute path for the directory where this file is located "here"

here = os.path.abspath(os.path.dirname(__file__))

# Get the absolute path for the project / repository root

project_root = os.path.abspath(os.path.join(here, ".."))

# Extend the system path to include the project root and import the env files

sys.path.insert(0, project_root)

import env_user

# Create a Cisco Spark object

spark = ciscosparkapi.CiscoSparkAPI(access_token=env_user.WT_ACCESS_TOKEN)

############## USER DEFINED SETTINGS ###############
# MERAKI SETTINGS
webhook_data = "Webhook Data Goes Here"
secret = "secret goes here"
####################################################

app = Flask(__name__)

@app.route("/", methods=["POST"])

def get_webhook_json():
    global webhook_data
    webhook_data = request.json
    pprint(webhook_data, indent=1)
#    webhook_data = json.dumps(webhook_data)
    spark.messages.create(
        env_user.WT_ROOM_ID,
        text="Meraki Webhook Alert: " + "Store: " + webhook_data["networkName"] + " || Alert: " + webhook_data["alertType"] + " || Link: " + webhook_data["networkUrl"]
    )
# Return success message
    return "WebHook POST Received"

# Launch application with supplied arguments

def main(argv):
    try:
        opts, args = getopt.getopt(argv, "hs:", ["secret="])
    except getopt.GetoptError:
        print("webhookreceiver.py -s <secret>")
        sys.exit(2)
    for opt, arg in opts:
        if opt == "-h":
            print("webhookreceiver.py -s <secret>")
            sys.exit()
        elif opt in ("-s", "--secret"):
            secret = arg
    print("secret: " + secret)

if __name__ == "__main__":
    main(sys.argv[1:])
    app.run(host="0.0.0.0", port=5005, debug=False)
By default, the script will post the whole webhook output to the Webex room. That was going to be too noisy for our use case, so I made some changes. Below is the output from a test webhook Meraki sent.
{'alertData': {},
 'alertId': '',
 'alertLevel': 'critical',
 'alertType': 'Power supply went down',
 'alertTypeId': 'power_supply_down',
 'deviceMac': 'e0:cb:bc:10:a7:ca',
 'deviceModel': 'MX65',
 'deviceName': 'My Store MX',
 'deviceSerial': 'AAAA-BBBB-CCCC',
 'deviceTags': [],
 'deviceUrl': 'https://n1.meraki.com/My-Store/n/AAAA/manage/nodes/new_wired_status',
 'networkId': 'N_111111111111111111',
 'networkName': 'My Store',
 'networkUrl': 'https://n1.meraki.com/Store-1/n/cKoTRa_/manage/nodes/wired_status',
 'occurredAt': '2021-03-08T22:06:52.663350Z',
 'organizationId': '111111',
 'organizationName': 'My Test Company',
 'organizationUrl': 'https://n1.meraki.com/o/AAAA/manage/organization/overview',
 'sentAt': '2021-03-08T22:06:52.844893Z',
 'sharedSecret': 'webbie',
 'version': '0.1'}
127.0.0.1 - - [08/Mar/2021 16:06:54] "POST / HTTP/1.1" 200 -
This output is in JSON so that you can pull any of these values very easily. I determined that the most important information for us would be:
networkName
alertType
networkURL
The first line of the code block below is the line you need to comment out (put a # at the beginning) so that you can pull the values via JSON. The second line (continuing to the 3rd line) is the second change I made to pull the information I wanted. The output of what that looks like in Webex is also below.
#    webhook_data = json.dumps(webhook_data)

text="Meraki Webhook Alert: " + "Store: " + webhook_data["networkName"] + " || Alert: " + webhook_data["alertType"] + " || Link: " + webhook_data["networkUrl"]
To run the python script, enter the following commands. The ‘-s webbie’ section of the command sets the secret that will be required when the webhook comes from Meraki. You can change it to whatever you like. It just needs to match what you enter in the Meraki dashboard in a later step. I also included a picture of what the terminal looks like after starting the script.
cd /home/code/meraki-code/meraki-webhooks/
python3 webhookreceiver1.py -s webbie
Ngrok Install
For this next section, keep the script above running in the terminal and open a new terminal session to get the Ngrok tunnel running.
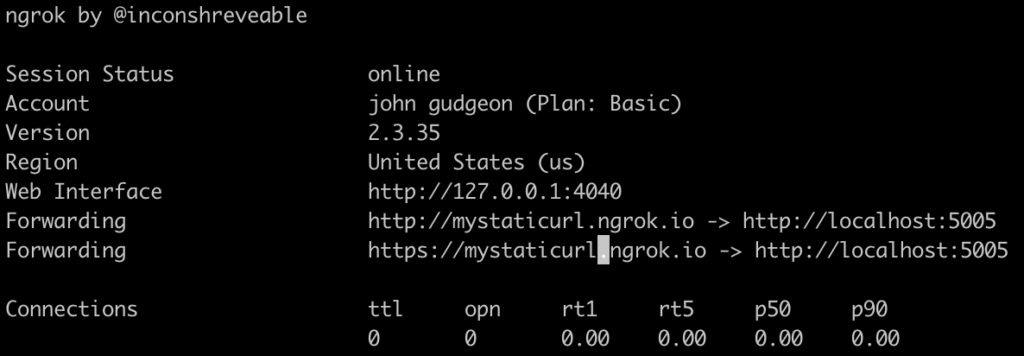
Ngrok will build a secure tunnel from the internet to your localhost so that you can receive the webhooks from the internet without having to expose your server to the internet by opening ports on your firewall. When running Ngrok, it will use a randomized URL. To prevent the URL from changing, you can purchase a plan on their website for a static URL. You can find their plans here.
To download ngrok on Ubuntu, run the following command below.
sudo snap install ngrokTo start the ngrok tunnel:
ngrok http 5005If wanting to run a static address, you can run this command. The Ngrok documentation for subdomains can be found here.
ngrok http -subdomain=mystaticurl 5005If the Ngrok tunnel is running correctly, your output should look like:

Configuring the Meraki Alert
Once on the Meraki network you wish to set up the alerts for, go to Network-wide > Alerts. At the bottom of the screen, there is the webhooks section. Give a name, the URL that is in the output above, the secret that you append to the end of the python script (my example used webbie). After all that is entered, click “Send test webhook”.

Go back and look at the two terminal sessions running ngrok and the python script. If everything is configured correctly, you should see an HTTP 200 response output on the ngrok terminal:

I am not posting the Meraki webhook screenshot as it contains sensitive information. Still, it should look like the JSON output I posted earlier in the blog with the networkName, alertType, etc.
With the script working now, you can choose what alerts you want to use the webhook by scrolling up on the Meraki Alerts page and selecting “+ show additional recipients”, clicking in the box that appears, and typing “Webhook”. This will allow you to filter what alerts you want to be sent via webhook.
Being Able To Run With The Terminals Closed
So far, all the work we have done will get the Meraki alerts into a Webex Teams room. However, it will break once you close the terminals running. By changing the commands that start the Ngrok tunnel and the python script, you can close the terminals and keep them running unless the server reboots.
nohup ngrok http -subdomain=mystaticurl --log=stdout 5005 > ngrok.log &
nohup python webhookreceiver1.py -s webbie
Be First to Comment